How to Set Up Your Booking Widget on Any Website
Your booking page is useful — but it works even better embedded directly in your own website, where visitors already are. This guide shows you how to add your booking widget to WordPress, Wix, Squarespace or any custom page in under five minutes.
You have probably seen it a hundred times: a business keeps its online booking on a separate page, at a separate address, and every visitor has to leave the website to make an appointment. Some of them never come back.
Embedding your booking widget fixes that — the booking flow appears right on your homepage, your "Book Now" landing page, or inside a blog post. Visitors book without ever leaving your site, which measurably increases the number of appointments you get. This guide walks you through every available method so you can pick the one that fits your website.
Why embed a booking widget on your website?
Fewer steps to book
Every click between "I want to book" and "appointment confirmed" is where you lose customers. An embedded widget removes the jump to a separate page — booking becomes one step.
Higher conversion
Visitors stay inside your site — with your branding, your trust signals, your live chat. They do not land on an unfamiliar page that feels like a third-party tool.
One widget, everywhere
Embed the same snippet on your homepage, your "Book" page, a service landing page, or even a training-page footer. All book into the same calendar — no duplicates, no sync.
Fits any site builder
Iframe and script-loading code work on WordPress, Wix, Squarespace, Shopify, Weebly — and on hand-coded HTML sites. No SDK, no API keys, no special plugin required (except the optional native WordPress one).
The three methods at a glance
| Method | Best for | How it works |
|---|---|---|
| 1. Iframe embed | Wix, Squarespace, Shopify, any custom HTML | A single <iframe> tag you paste where the widget should appear. |
| 2. Script loader | WordPress/Joomla-style CMS that restrict raw iframes | A <div> container + a script that injects the iframe into it. |
| 3. WordPress plugin | WordPress (fastest setup) | A Gutenberg block and a [clickobook] shortcode, pre-configured with your account. |
Step 1 — Get your embed code
All three snippets are generated for you — you never write code by hand.
-
1
Log in to your Clickobook admin panel.
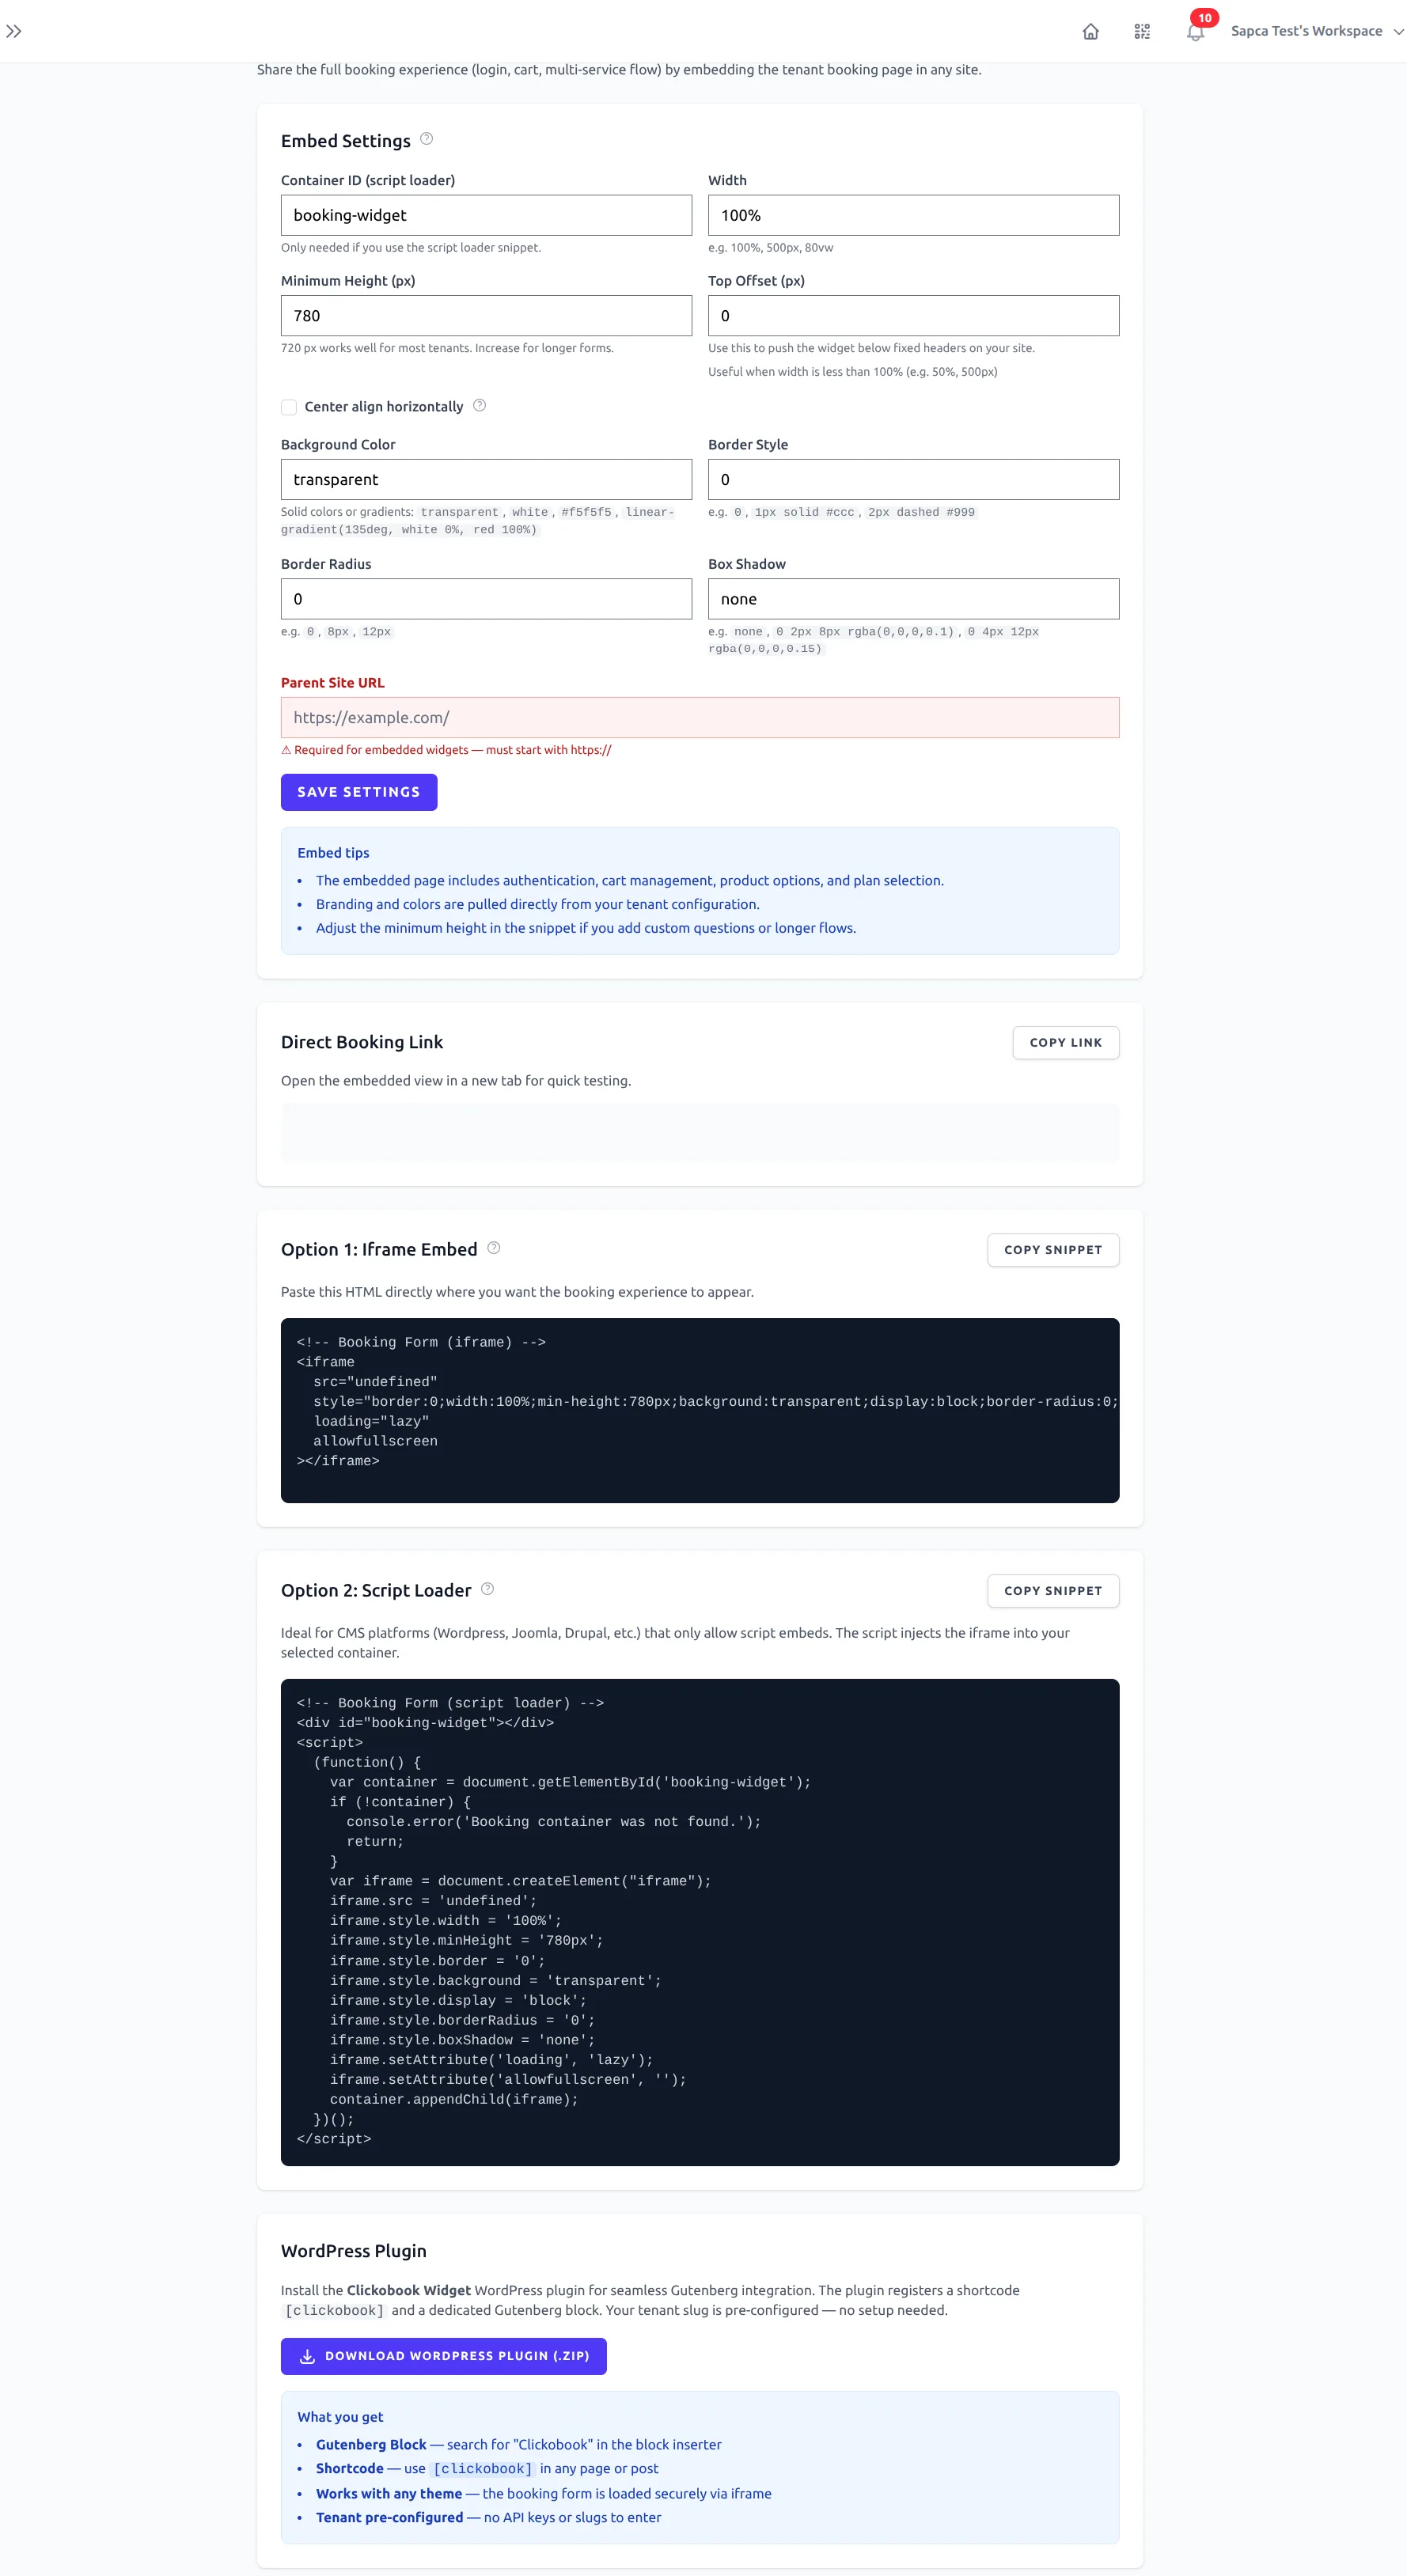
Go to Widget → Widget Embed in the sidebar menu.
-
2
Adjust the embed settings to taste.
Width, height, top offset, background, border, corner radius and shadow — all optional. The code updates live as you change them. These settings are not saved to the database; they exist only to generate the snippet you copy.
-
3
Copy your snippet.
Pick Option 1 (iframe) or Option 2 (script loader) below, hit Copy Snippet, and paste it into your website. Or scroll to the WordPress section and download the plugin instead.
💡 Quick test before you paste
The page shows a Direct Booking Link — open it in a new tab to preview exactly what your visitors will see inside the widget, and to verify the settings.
Option 1 — Iframe embed (works everywhere)
Recommended for Wix & most site buildersThe iframe snippet is a single HTML tag. Any platform that lets you insert custom HTML — Wix "Embed HTML", Squarespace "Code Block", Shopify, Weebly, GoDaddy, or a raw HTML file — can render it.
<!-- Booking Form (iframe) -->
<iframe
  src="https://your-domain.com/t/your-business/booking?embed=true&return_url=https://your-site.com/"
  style="border:0;width:100%;min-height:720px;background:transparent;display:block;"
  loading="lazy"
  allowfullscreen
></iframe>
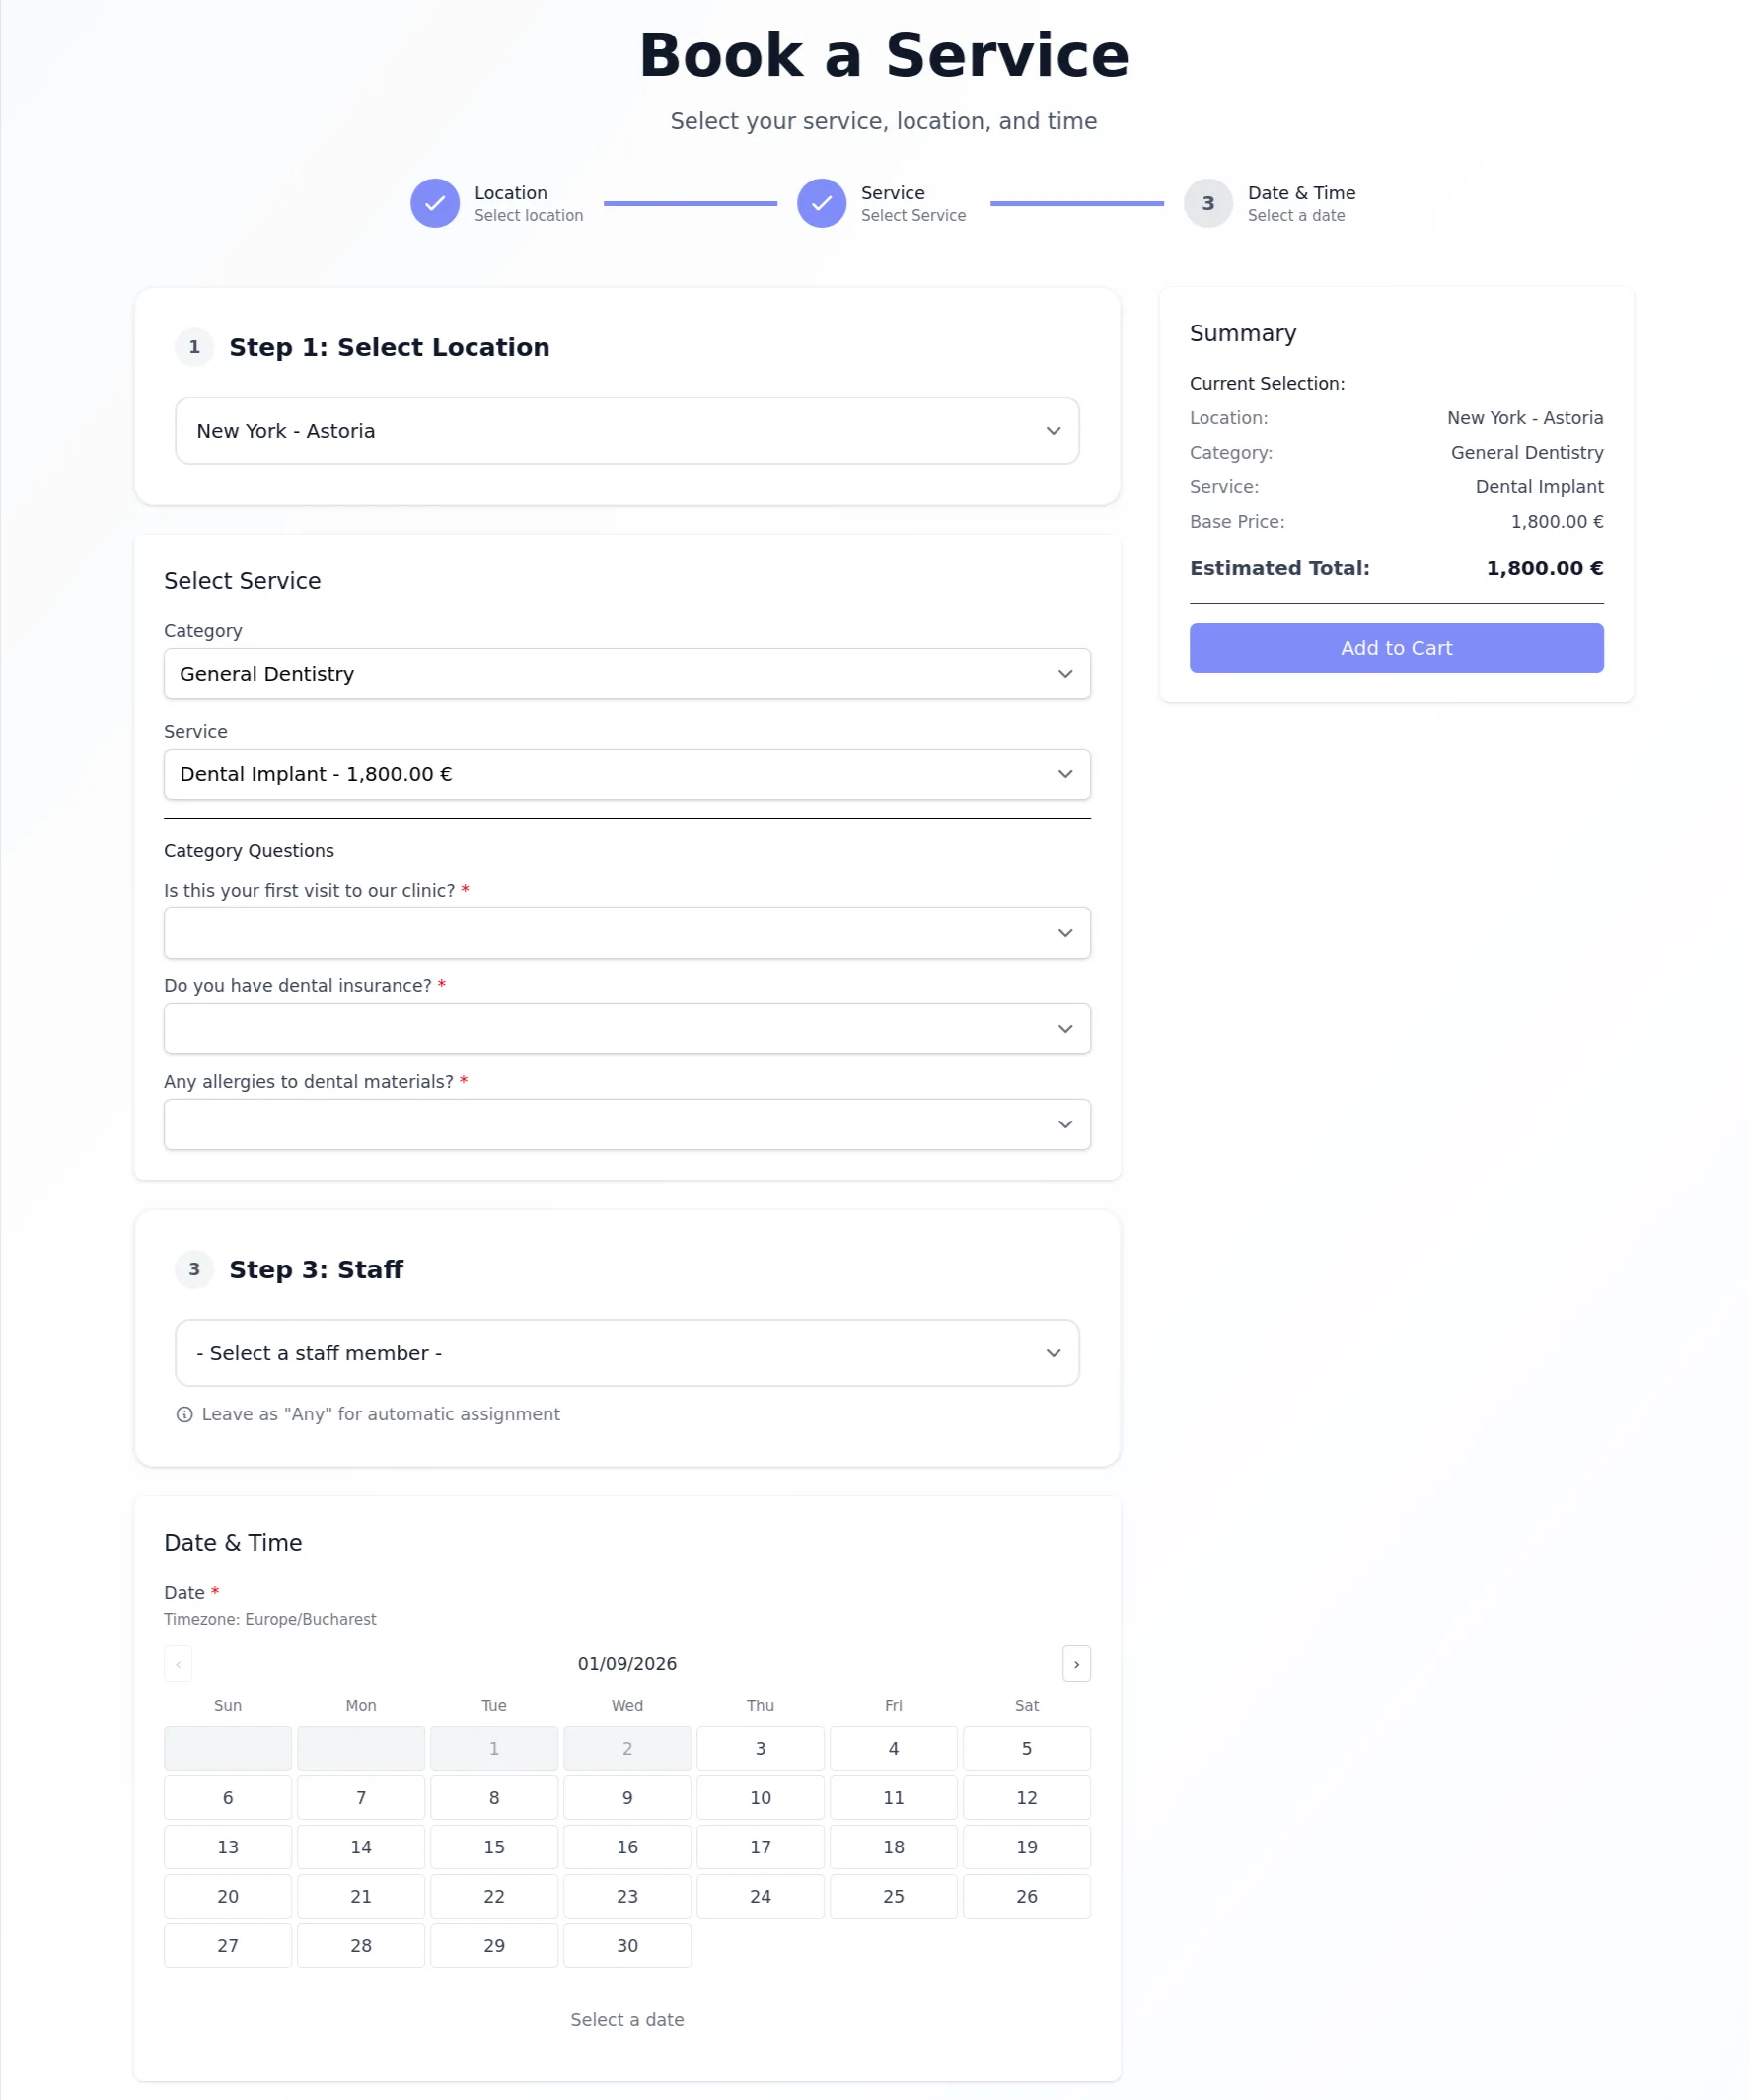
The snippet you copy already contains ?embed=true, which switches the booking page into its clean "embedded" mode — no site header or footer, just the booking flow, styled with your branding.
Where to paste it
Wix
Editor → Add → Embed → HTML iframe → paste the code (use "Embed Code" → "Other" directly as HTML). Size the element to fit your layout.
Squarespace
Add a Code Block to any section, paste the snippet, and it renders on the page. Works on 7.0 and 7.1.
Shopify
Add an "HTML" content block via the theme editor, or open your theme's page template and paste the snippet into the section where you want the booking form.
Custom HTML site
Paste the iframe tag anywhere in the <body> of your page. Make sure the page is served over HTTPS — modern browsers block iframes from insecure pages.
⚠️ A note for CMS editors
When you paste an iframe into the admin-panel preview of WordPress (Gutenberg), Joomla or other editors, the preview can show "refused to connect". That is the CMS sandbox blocking the iframe — not a broken widget. Publish the page and view it from the front end; it will load correctly.
Option 2 — Script loader (for CMS platforms)
Recommended for WordPress/Joomla/Drupal
Some CMS platforms restrict raw iframe tags in certain areas. The script loader sidesteps this:
you paste a <div> where the widget should
appear, plus a small script that creates the iframe and injects it into that container.
<!-- Booking Form (script loader) -->
<div id="booking-widget"></div>
<script>
  (function() {
    var container = document.getElementById('booking-widget');
    if (!container) {
      console.error('Booking container was not found.');
      return;
    }
    var iframe = document.createElement("iframe");
    iframe.src = 'https://your-domain.com/t/your-business/booking?embed=true&return_url=https://your-site.com/';
    iframe.style.width = '100%';
    iframe.style.minHeight = '720px';
    iframe.style.border = '0';
    iframe.style.background = 'transparent';
    iframe.style.display = 'block';
    iframe.style.borderRadius = '0';
    iframe.style.boxShadow = 'none';
    iframe.setAttribute('loading', 'lazy');
    iframe.setAttribute('allowfullscreen', '');
    container.appendChild(iframe);
  })();
</script>
Why use a container ID
The Container ID field in the embed settings names the <div>
the script fills. If you embed multiple widgets on one page, or your theme already uses an id such as
booking-widget, change it to something unique
(e.g. cb-widget-1) so the script always targets
the right container.
💡 Which one should I choose?
If your site builder has an "Embed HTML / Code" element, the iframe is simplest. If you are on a CMS that prefers scripts or you are a developer who wants the widget injected programmatically, use the script loader. Both produce an identical widget.
Option 3 — The WordPress plugin (fastest on WordPress)
Gutenberg block + shortcodeIf your site runs WordPress, Clickobook ships a dedicated plugin that removes even the copy-paste step. It is generated per-account: your business URL is pre-configured inside, so there are no API keys and no settings to fill in.
-
1
Download the plugin.
On the Widget Embed page, click Download WordPress Plugin (.zip). You receive a zip file already configured with your account.
-
2
Install it in WordPress.
Plugins → Add New → Upload Plugin → choose the zip → Activate. It appears as Clickobook Widget.
-
3
Add it to any page or post.
Two ways in:
- Gutenberg block — in the editor, click "+" and search for "Clickobook". Drop the block, then use the Inspector panel to set width and height.
- Shortcode — add the block or code
[clickobook]anywhere. You can also pass attributes:[clickobook width="600px" height="800"].
💡 Why the plugin is convenient
The theme does not matter — the booking form is always loaded securely via iframe, so it works with any WordPress theme. The block is a "dynamic" block rendered on the server, so it also works on cached pages. And a "Settings" link appears on the plugins list that takes you straight to the Clickobook admin panel.
Customizing the embed appearance
Every option below is generated into your snippet automatically — you just set them on the Widget Embed page and copy.
Sizing
- Width — fixed pixels (500px), a percentage (100%), or a viewport unit (80vw).
- Minimum height — 720 px works well for most businesses; increase it if you add custom form questions or a longer flow.
- Center align — when the width is less than 100%, centers the widget horizontally on your page.
Positioning
- Top offset — pushes the widget down by a set number of pixels. Perfect for clearing fixed headers, announcement bars or cookie banners on your site.
- Box shadow — add visual depth with e.g. 0 4px 12px rgba(0,0,0,0.15) so the widget lifts off the page.
Frame styling
- Border — 0 for none, or any CSS border such as 1px solid #e5e7eb.
- Border radius — rounded corners like 12px for a softer, more modern look.
- Background — transparent (default), a solid color, or even a CSS gradient.
Parent site URL
- Required for embedded widgets — must start with https://. This is your website address.
- After checkout, the confirmation page's "Home" button returns the visitor to this URL instead of keeping them in the widget.
- The URL is validated server-side, so insecure or invalid addresses are rejected.
Making the widget look native to your site
An iframe never "sees" your website's CSS — but the booking page inside it has its own design system, and it is yours to control.
Match colors, fonts and buttons
Your logo, accent colors, fonts, button style and corner radius are pulled from Widget → Layout (the unified layout editor). Change them once and every place your booking page appears — standalone or embedded — updates instantly.
Add a "Book Now" wrapper, not a "Booking" page
Instead of a separate page, put the widget directly on your homepage hero or a services page. Users can book the moment they decide — no navigation required.
Test with a real booking
After embedding, make a test booking on the live page. Verify the widget height shows the full flow (especially if you have many services or form questions), and check that the "Home" button on the confirmation page returns to your website.
✅ 5-minute setup checklist
- 1. Open Widget → Widget Embed in your admin panel.
- 2. Set the width / height / offset / frame styling you want (or keep defaults).
- 3. Enter your website address as Parent Site URL (starts with https://).
- 4. Copy the iframe snippet — or use the script loader / WordPress plugin if you prefer.
- 5. Paste into your site, publish, and run a test booking.
Booking widget embed — frequently asked questions
Yes. Wix supports custom HTML blocks — open the Editor, add an "Embed HTML" (or "Embed a Widget") element, paste the iframe snippet and publish. The same iframe snippet works on Squarespace (Code Block), Weebly, GoDaddy Website Builder, Shopify and any other platform that accepts custom HTML.
No — this is expected. Content management systems like WordPress (Gutenberg preview) and Joomla load admin-panel previews inside a sandboxed iframe, and security headers block the booking page in that context. On the live, published page the widget loads normally. Test on the public site, not in the editor preview.
The full booking experience: service selection, dynamic pricing, product options, cart management, customer login/registration and secure checkout — everything your customers see on your Clickobook booking page, without your site's surrounding navigation. Branding and colors are pulled automatically from your Layout settings, so it matches your brand.
It is the address of your website, e.g. https://your-site.com. When a customer finishes booking inside the embedded widget, the confirmation page shows a "Home" button that navigates the top browser window back to your site. Without it, that button would take the customer to a new booking instead of returning them to you.
Yes. If you connect a custom domain to Clickobook, the booking page works there, and you can point the widget at that address — the embedded widget handles both the Clickobook subdomain and your own domain automatically.
Embedding is part of the widget customization features included with your plan — there is no separate fee and no per-booking commission. You pay only your usual payment provider fees (Stripe/PayPal) on payments you collect.
Related resources
How to Collect Deposits for Appointments
Turn embedded bookings into committed appointments with deposits at checkout.
How to Automate Appointment Reminders
Email and SMS reminders that keep every embedded booking top of mind.
Pricing
Flat per-business pricing, 0% commission — embedding included.
Clickobook features
See everything the platform offers, from AI forms to custom domains.
Put your booking widget on your website today
Clickobook gives you a ready-made embed code, a WordPress plugin and full branding control — no coding required. Start your free trial and embed your booking page in minutes.