How to Set Up Online Payments (Stripe + PayPal) for Your Booking Page
Let your customers pay by card or PayPal the moment they book — whether that is the full amount, a deposit, or nothing at all. This guide walks you through connecting Stripe and PayPal in Clickobook, wiring up the required webhooks, and collecting the remaining balance later.
Booking confirmation emails are nice. But what actually protects your revenue is a customer who has already paid when the appointment is made. Online payments turn your booking page from a calendar into a cash register — guests pay by card or PayPal at checkout, and you get paid before you spend a minute of staff time.
This guide covers everything you need. You will connect your own Stripe and PayPal accounts, wire up the webhooks that keep payments in sync, choose what customers see at checkout (pay in full, deposit, or pay later), and learn how to collect the remaining balance with a payment link. All settings shown are the real ones in your admin panel — no hidden fees, no plugins.
Why take payments online?
Get paid upfront
Money lands in your Stripe or PayPal account the moment the booking is made — no chasing payments after the service.
Fewer no-shows
A customer who paid a deposit shows up. Online payment is one of the most effective ways to reduce no-shows without brick-and-mortar friction.
Offer payment flexibility
Let customers choose: pay in full and get a discount, leave a deposit, or select pay-at-venue. Different clients prefer different options — you cover them all.
Automatic record-keeping
Every payment creates a transaction and an invoice automatically. Your reports, taxes and accounting stay in sync without manual data entry.
How online payments work in Clickobook
Understanding the flow makes the setup steps much easier to follow. Here is what happens between you, your customer and the payment providers.
You connect your own accounts
In Admin → Settings → Payment you paste your Stripe API keys and/or your PayPal Client ID & Secret. The money never goes through the platform — it settles directly into your Stripe or PayPal balance, automatically deducted from the customer.
Customers pay at checkout
On your booking page, customers see the payment methods you enabled — card (Stripe), PayPal, or "At venue" — and choose how much to pay now: the full amount, a deposit, or nothing at all.
Webhooks keep everything in sync
Stripe and PayPal send real-time event notifications ("webhooks") to the platform. These record the payment, confirm the booking, create the transaction and invoice — even if the customer closes the browser right after paying.
You collect the balance later with a link
If a customer paid only a deposit, the remaining balance is tracked automatically. From the booking page in your admin panel you can copy a payment link (or show a QR code) and send it to the customer to pay the rest online.
What you need before you start
Stripe: a Stripe account (free to create at stripe.com). You will copy your Publishable Key and Secret Key from the Stripe Dashboard and paste them into Clickobook.
PayPal: a PayPal business account and a REST app created in the PayPal Developer Dashboard (you get the Client ID and Secret there).
Time: about 10–15 minutes for both providers.
Step 1 — Enable Stripe payments
Stripe is the card processor. Once enabled, your customers can pay by credit or debit card directly on your booking page. Everything is configured in Admin → Settings → Payment.
Tick "Enable Stripe payments"
In the Stripe section of Payment settings, tick the checkbox. This reveals the API key fields and your Webhook URL.
Find your API keys in Stripe
Log in to stripe.com and open Settings → Developers → API keys (direct link: dashboard.stripe.com/apikeys). You need two keys:
-
a
Publishable Key — starts with
pk_live_→ paste into the "Publishable Key" field. -
b
Secret Key — starts with
sk_live_→ paste into the "Secret Key" field (it is masked when you type it).
Copy your Webhook URL
The Webhook URL field shows your unique endpoint. Click Copy — you will paste it in Stripe in the next step. This is required for both one-time payments and subscriptions.
Save your settings
Click Save Payment Settings at the bottom of the section. The button toggles on once Stripe is enabled.
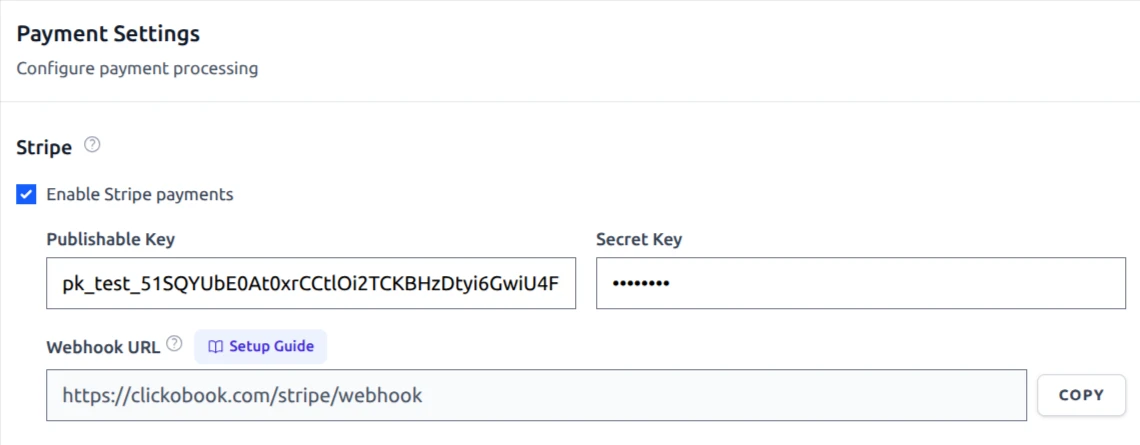
Payment settings → Stripe: enable the toggle, paste your two keys and copy the Webhook URL.
Testing option
For a test environment, paste test keys instead — they start with pk_test_ / sk_test_. Test card 4242 4242 4242 4242 always succeeds. Just remember to switch to live keys when you are ready for real payments.
Step 2 — Connect your Stripe webhook
The webhook is what lets Clickobook know a payment happened — and it is required even for one-time payments, not just subscriptions. It records payments made through "Pay remaining" links, confirms bookings, and processes refunds automatically.
The exact steps are in your admin panel
Next to the Webhook URL field there is a "Setup Guide" button (exactly where it is in the screenshot above). Click it for the full step-by-step modal — here is the summary:
Open your Stripe Dashboard → Webhooks
Log in to stripe.com and navigate to Developers → Webhooks (dashboard.stripe.com/webhooks), or open the Developer Tools bar at the bottom of any Stripe page. Make sure you are in the same account as the API keys you entered, then click Add destination.
Choose what to listen to
Select "Your account", then "Listen to events" and subscribe to ALL the events listed below. Click Continue.
Add ALL eight events
Required Stripe events
payment_intent.succeededcheckout.session.completedcharge.refundedinvoice.paidinvoice.payment_failedinvoice.finalizedcustomer.subscription.updatedcustomer.subscription.deleted
Paste the Webhook URL & save
Choose Webhook endpoint as the destination type, paste the URL you copied in step 1 into the Endpoint URL field, then click Add destination (or Create destination).
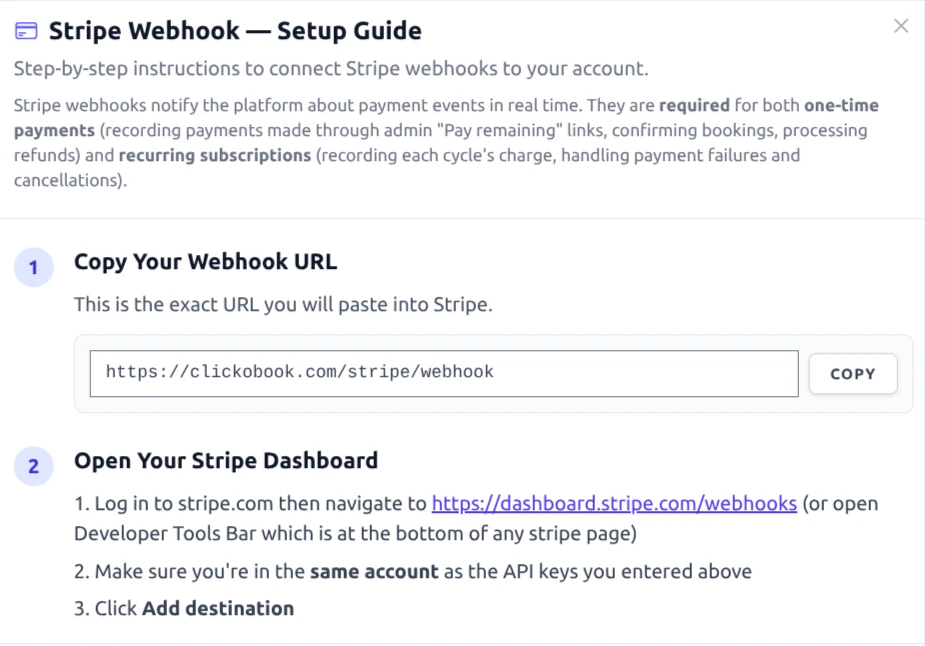
The Stripe "Setup Guide" modal lists your exact Webhook URL and the events to subscribe to.
If payments work but nothing is recorded
- Confirm the webhook was created in the same Stripe account as your Secret Key.
- Verify
checkout.session.completedandpayment_intent.succeededare subscribed. - Stripe's Workbench → Events tab shows failed deliveries — you can click Resend.
Step 3 — Enable PayPal
PayPal is the second online method. Many customers simply prefer paying with PayPal — especially for recurring memberships. As with Stripe, you configure it in Admin → Settings → Payment.
Create (or open) your PayPal REST app
developer.paypal.com
Log in to your PayPal account and go to developer.paypal.com/dashboard/applications. If you have no app yet: Create app → give it a name → select Merchant as the type → choose your business account → Create app. You now have your Client ID and Secret.
⚠️ One app for everything. Your keys and your webhook must belong to the same app — PayPal only sends events to the webhook of the app that processed the payment.
Fill in the settings
Admin → Settings → Payment
- Tick Enable PayPal payments
- Paste your Client ID and Secret
-
Set Mode to
Sandboxfor testing orLivefor real payments - Copy your Webhook URL for the next step
- Click Save Payment Settings
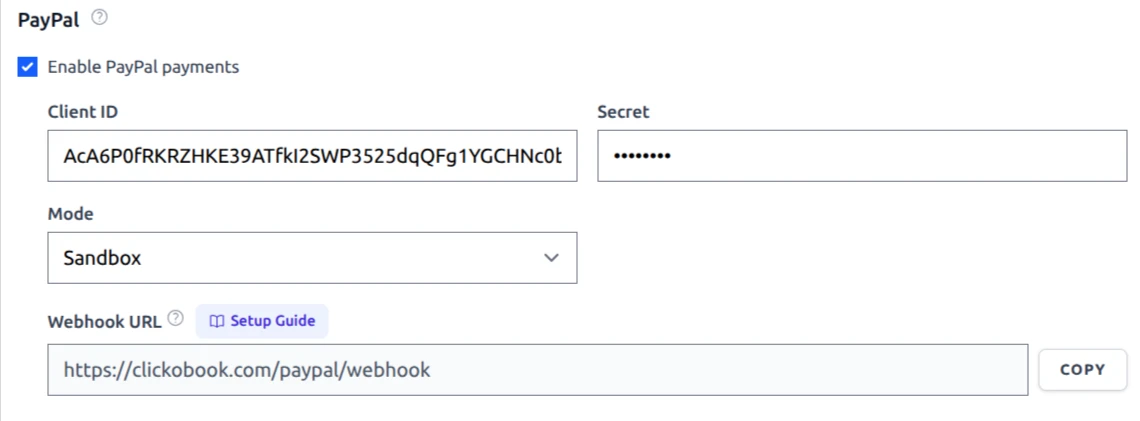
Payment settings → PayPal: enable the toggle, paste your Client ID and Secret, choose Sandbox or Live.
Currency limit — check before you enable
PayPal supports a fixed list of currencies: AUD, BRL, CAD, CHF, CNY, CZK, DKK, EUR, GBP, HKD, HUF, ILS, JPY, MXN, MYR, NOK, NZD, PHP, PLN, RUB, SEK, SGD, THB, TWD, USD. If your store currency is not in this list, the PayPal toggle is automatically disabled and a notice appears — you can change your currency in Admin → Settings → General.
Step 4 — Connect your PayPal webhook
Like Stripe, PayPal needs a webhook so the platform can record payments, confirm bookings and handle subscription events. Use the "Setup Guide" button next to the Webhook URL field in your payment settings — here is the summary.
Open your app in the developer dashboard
Go to developer.paypal.com/dashboard/applications and open the same app whose Client ID you entered in Settings → Payment. Scroll to the Webhooks section.
Paste the Webhook URL and select the events
Click Add Webhook, paste your Webhook URL into the field, then select the event types below (use Show all events and pick each one). Click Save.
Add ALL nine events
Required PayPal events
PAYMENT.CAPTURE.COMPLETEDCHECKOUT.ORDER.APPROVEDPAYMENT.SALE.COMPLETEDBILLING.SUBSCRIPTION.PAYMENT.COMPLETEDBILLING.SUBSCRIPTION.PAYMENT.FAILEDBILLING.SUBSCRIPTION.CANCELLEDBILLING.SUBSCRIPTION.SUSPENDEDBILLING.SUBSCRIPTION.EXPIREDBILLING.SUBSCRIPTION.ACTIVATED
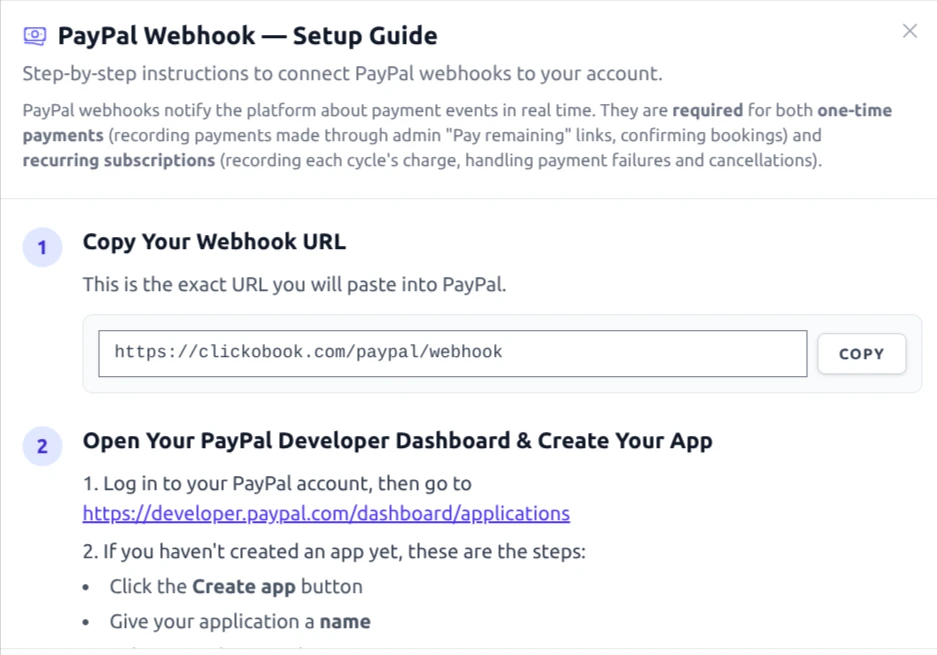
The PayPal "Setup Guide" modal — complete with the copyable Webhook URL and the events to subscribe to.
Troubleshooting
- Webhook verification failing? It must be on the same app whose Client ID and Secret are in Settings → Payment, and the URL must have no trailing slash.
- Payment taken but no transaction recorded? Check
PAYMENT.CAPTURE.COMPLETEDandCHECKOUT.ORDER.APPROVEDare subscribed; open Event logs → Webhook Events in the developer dashboard and resend failed deliveries. - Recurring charges not recorded? Subscribe to
BILLING.SUBSCRIPTION.PAYMENT.COMPLETEDandBILLING.SUBSCRIPTION.PAYMENT.FAILED.
What your customers see at checkout
Once your providers are connected, the booking page presents the payment methods you enabled. Customers pick how to pay — and, if you have deposits enabled, how much to pay now.
Pay in full
Card or PayPal
The customer pays 100% of the price at checkout. If you set a full-payment discount, the discounted amount is charged automatically — an incentive that improves your cash flow.
Pay deposit only
e.g. 30% now, 70% later
The customer pays a deposit (percentage or fixed amount) now, and the remaining balance is tracked automatically. You collect it later with a payment link — or at the venue.
At venue (cash)
Cash or card on arrival
Customers reserve without paying online and settle at the venue. Enabled under At Venue (Cash) in Payment settings — available by default, including "pay later" bookings without a deposit policy.
Deposits work with both providers
Deposit payments are processed by Stripe and PayPal exactly like full payments — a 30% deposit means a PaymentIntent/order for 30% of the price. When the full-payment discount is active, choosing "Pay in full" applies it automatically. See our deposit guide and full-payment discount guide for the full picture.
Collecting the balance — payment links & QR codes
When a customer paid only a deposit — or booked at the venue and never paid online — you can collect the remaining amount with a payment link, right from the booking page in your admin panel. No need for the customer to redo the whole checkout.
Open the booking in Admin → Bookings
Any booking without a successful online payment shows a Payment section with the total due. Failed or refunded transactions don't block it — the customer can pay or retry.
Generate a payment link
Copy Payment Link creates a Stripe Checkout session or PayPal order for the remaining balance — you can adjust the amount if you want to charge more or less. Send the link by email, WhatsApp or SMS.
Show a QR code (in-person payment)
Click QR Code to display a scannable code on screen. The customer scans it with their phone and pays the balance while still at the venue — perfect for "I left my card at home" moments.
Payment is recorded automatically
When the customer pays, the redirect back to the success page verifies the payment, and the Stripe/PayPal webhook is the safety net if they close the browser first. The transaction, invoice and booking status update automatically.
Good to know
This is the same mechanism used after a deposit: the remaining balance is computed automatically (remaining = total − paid) so you never have to do the math. You can also use payment links to top up extras or price overruns added later.
Refunds, invoices & receipts
Every payment creates a transaction and its own invoice automatically. That keeps your records, reports and customer receipts consistent.
Refunds (full or partial)
Process refunds from Admin → Transactions for both Stripe and PayPal. Partial refunds are supported and accumulate on the original transaction; a credit note is created automatically for your accounting.
Invoice per payment
Each deposit, full payment, balance payment or surcharge generates its own invoice (and receipt) with the provider, amounts and taxes — ready for Xero if you sync accounts.
Set your refund policy in advance
Decide — and publish in your Terms page — whether deposits are refundable or non-refundable on cancellation. "Pay in full" with the discount is usually refundable minus the discount, and the platform tracks everything so refunds are traceable per transaction.
Fees, commission & multi-currency
The platform takes 0% commission
You keep everything
Clickobook charges no commission on any payment — deposits, full payments, balance payments or subscriptions. You only pay the standard processor fees your provider charges (typically ~2.9% + $0.30 for Stripe card payments; PayPal pricing varies by country and volume).
Multi-currency
One currency per business
Your store has a base currency set in Admin → Settings → General, used for prices, invoices and payment links. Stripe supports a broad range of currencies; PayPal only the list shown in the setup above — the settings warn you automatically if yours is unsupported.
Which provider should you enable?
Most businesses enable both — card coverage is wider with Stripe, while many clients (and subscription customers) prefer PayPal. Keep "At venue" on as well: for some clients paying on arrival is the trust signal that converts them. All three coexist without conflict.
Common mistakes to avoid
Skipping the webhook (the #1 mistake)
Without a webhook, payments taken by Stripe/PayPal are never recorded — bookings stay unpaid, no transactions or invoices appear, and "Pay remaining" links silently do nothing. Always complete steps 2 and 4 above: they are required for one-time payments, not just subscriptions.
Using keys and webhook from different accounts/apps
For Stripe, the webhook endpoint must be in the same account as your secret key. For PayPal, keys and webhook must be on the same app. Mixing them causes "signature mismatch" and events that never arrive.
Going live with test keys
Test keys (pk_test_/sk_test_, PayPal Sandbox mode) work, but customers can't pay real money. Double-check you switched to live keys and Live mode before promoting your booking page.
Forgetting to collect balances
Deposit bookings leave a balance that you control collection of. Build the habit of sending the payment link after high-value appointments — otherwise the balance becomes a write-off. The booking page shows exactly what is still due.
Ignoring the currency warning
If your currency isn't supported by PayPal, its toggle is disabled for a reason — enabling it would produce failed payments. Change the store currency in General settings, or rely on Stripe for that market.
The 3-minute health check
Make a test booking with each provider using test mode, then check Admin → Transactions: a transaction (and invoice) should appear for every successful payment. If a payment succeeded but no transaction exists, your webhook is missing or on the wrong account/app — fix that before going live.
Online payments — frequently asked questions
Yes. You connect your own Stripe and/or PayPal account (or an app in PayPal sandbox mode for testing). Payments are processed by your provider and settle directly into your own Stripe or PayPal balance — the platform never holds your money and charges 0% commission on anything you collect.
Webhooks are real-time notifications your payment provider sends to the platform when something happens — a payment succeeded, a refund was issued, a subscription was charged or cancelled. They are required for one-time payments too: they record payments made through "Pay remaining" links, confirm bookings, and apply refunds even if the customer closes the browser mid-payment. Without them, payments would not be recorded automatically.
If you already have a Stripe account, about 10 minutes: paste the two API keys, copy the webhook URL into Stripe, subscribe to the required events and save. PayPal takes a little longer the first time because you need to create a REST app in the PayPal developer dashboard and select the events for it.
No — 0% commission. You keep 100% of what you charge, minus the standard processor fees charged by Stripe or PayPal (typically around 2.9% + $0.30 per card transaction). There are no hidden per-booking fees.
Yes. At checkout customers can pay in full, pay only a deposit and settle the balance later, or choose to pay at the venue (cash/card on arrival). When a balance remains, you can send a payment link directly from the booking page in the admin panel and the customer pays the remaining amount online.
You can refund payments from the admin panel (Admin → Transactions) for both Stripe and PayPal — full or partial. Each refund is tracked against the original transaction, and a credit note is generated automatically for your accounting records.
No. PayPal supports a fixed list of currencies (USD, EUR, GBP and about 20 others). If your store currency is not supported, PayPal is automatically disabled in the settings and a notice explains how to change currency. Stripe supports a much wider range of currencies.
Yes. For Stripe, use test API keys (they start with pk_test_ / sk_test_) and Stripe's test cards such as 4242 4242 4242 4242. For PayPal, switch the mode in the payment settings to Sandbox and use a sandbox app from the PayPal developer dashboard.
Related resources
Ready to accept payments online?
Clickobook connects Stripe and PayPal out of the box — cards, PayPal, deposits, payment links and automatic invoices, with 0% commission. Start your free trial today.