How to Connect Booking Events to Your CRM with Webhooks
Every new booking, cancellation, reschedule and completion can be pushed to your CRM, accounting tool, spreadsheet or chat in real time — automatically. This guide shows you how to wire up Clickobook bookings to Zapier, n8n, Make and Pabbly Connect using webhooks, no code required.
You run a service business, customers book online, and everything lives in the booking system. Then, somewhere else, sits the rest of your business: a CRM with your contacts, an accounting tool that issues invoices, a Google Sheet where you track revenue, a Slack channel where your team talks.
Without a connection, someone has to copy every booking into those systems by hand. That is slow, error-prone, and it stops being viable the moment your volume grows. Webhooks fix this — they push each booking event to your other tools automatically, the second it happens.
Why connect your booking events to other tools?
No more manual data entry
Every booking appears in your CRM, spreadsheet or accounting tool automatically. Your team stops retyping names, emails and prices — and stops making typos.
Real-time accuracy
The webhook fires the moment the event happens. A cancellation updates your CRM and frees your calendar in other systems instantly — not at the end of the day when someone notices.
Your tools, your way
Webhooks are a universal standard — the same booking data can flow into a CRM, accounting, analytics, helpdesk or a private database. You are not locked into one stack.
Scale without hiring
The more bookings you have, the more manual work webhooks save you. What takes an admin an hour a day becomes an automated pipeline that runs by itself.
What you will be able to automate
| Booking event | Typical automation | Platforms |
|---|---|---|
| New booking | Create a CRM contact, add a lead, log a Google Sheets row, notify the team | Zapier, n8n, Make, Pabbly |
| Cancellation | Update the contact, alert you so you can re-book the slot, mark the record | Zapier, n8n, Make, Pabbly |
| Reschedule | Update appointment dates in your CRM and send the customer a confirmation | Zapier, n8n, Make, Pabbly |
| Completion | Create the invoice, trigger a review request, record revenue, mark the job done | Zapier, n8n, Make, Pabbly |
How Clickobook webhooks work
A webhook is an automatic HTTP POST request that Clickobook sends to a URL you control whenever a booking event happens. The request body is a JSON payload describing the booking — and your receiving tool (an automation platform, or your own endpoint) processes it in real time.
POST /your-webhook-url
Content-Type: application/json
X-Booking-Tenant:  t-001
X-Booking-Event:   booking_created
X-Booking-Delivery-Id: 550e8400-e29b-41d4-a716-446655440000

{
  "event": "booking_created",
  "booking_number": "BK-20260901-0042",
  "status": "confirmed",
  "booking_date": "2026-09-05",
  "start_time": "09:00:00",
  "service_name": "Dental Consultation",
  "customer_name": "Paul Johnson",
  "customer_email": "[email protected]",
  "total_price": 200.00,
  "payment_status": "completed",
  "invoice_number": "TEN-MY-BIZ-2026-000123"
}
That is the whole mechanism. Everything else — getting the URL, mapping the fields, running the follow-up action — happens in the tool you connect to. Clickobook simply delivers the event to the URL you configure, and lets you enable or disable each event individually.
💡 What webhooks are not
Webhooks are push, not pull. Your endpoint does not go and fetch data — it is notified with the data. If you also need to pull existing records on demand for a rich two-way integration, you can combine webhooks with the REST API keys available on your plan. For the majority of "send booking to my CRM / spreadsheet / accounting" use cases, webhooks alone are enough.
The four booking events you can subscribe to
Clickobook emits four distinct booking events. Each has its own URL field and its own enable toggle, so you subscribe only to what you need.
booking_created
A new booking is made. This is your trigger for creating CRM contacts, logging leads or alerting your team.
booking_cancelled
A booking is cancelled. Great for updating your CRM and flagging a freed slot you can re-book.
booking_rescheduled
A booking moved to a new date or time. The payload includes the old details in metadata so you can update records.
booking_completed
A booking is marked done. The natural trigger for issuing the invoice, recording revenue and sending a review request.
⚠️ Enable each event separately
The per-event toggles matter. If you only tick "Booking created", cancellations and reschedules will not be sent. Decide which events your follow-up actions actually need, and tick those — you can add more later without re-creating your whole integration.
What data each webhook sends
The JSON payload is deliberately flat for the most important fields, so automation platforms can map them directly in their field pickers. Alongside the flat fields there are nested objects for the customer, staff, location, product and plan.
Flat fields you can map in any automation tool
| Field | Description |
|---|---|
| id | Unique booking ID |
| booking_number | Human-readable reference, e.g. BK-20260901-0042 |
| event | The event type |
| status | Booking status (pending / confirmed / cancelled, etc.) |
| booking_date | Appointment date (YYYY-MM-DD) |
| start_time / end_time | Start / end time |
| service_name | Service or product name |
| total_price | Total price (tax included) |
| currency | Currency (EUR, USD, RON, etc.) |
| tax_rate / tax_amount / tax_label | Tax percentage, tax amount and tax name |
| net_price | Price excluding tax |
| tax_included | Whether tax is included in total_price |
| discount | Total discount applied |
| coupon_code | Coupon code used (if any) |
| invoice_id / invoice_number | Associated invoice reference (when available) |
| payment_method / payment_provider | How the customer paid (card, paypal, at_venue…) |
| payment_status | Pending / completed / failed / refunded |
| deposit_amount | Configured deposit for the booking |
| paid_amount | Actual amount paid so far |
| balance_due | Remaining balance (0 = fully paid) |
| customer_name / customer_email / customer_phone | Customer contact details |
| staff_name | Assigned staff member |
| location_name / location_address | Where the appointment happens |
| product_name | Product name (for product services) |
| plan_name | Plan name (for subscription/plan bookings) |
| tenant_slug | Your business's unique slug |
In addition to these flat fields, the payload includes nested objects: customer
(id, name, email, phone, address), staff, location,
product, plan and metadata
(e.g. the old date/time on a reschedule). Most automation platforms expose both the flat fields and the nested ones in their mapping UI.
{
  "id": "550e8400-e29b-41d4-a716-446655440000",
  "booking_number": "BK-20260901-0042",
  "event": "booking_created",
  "status": "confirmed",
  "booking_date": "2026-09-05",
  "start_time": "09:00:00",
  "end_time": "10:00:00",
  "service_name": "Dental Consultation",
  "currency": "EUR",
  "total_price": 200.00,
  "tax_rate": 19.0,
  "tax_amount": 31.93,
  "tax_label": "VAT",
  "tax_included": true,
  "net_price": 168.07,
  "discount": 0,
  "coupon_code": null,
  "invoice_id": "31f8c6e4-...",
  "invoice_number": "TEN-MY-BIZ-2026-000123",
  "payment_method": "card",
  "payment_provider": "stripe",
  "payment_status": "completed",
  "deposit_amount": 0,
  "paid_amount": 200.00,
  "balance_due": 0,
  "customer_name": "Paul Johnson",
  "customer_email": "[email protected]",
  "customer_phone": "+40722123456",
  "staff_name": "Dr. Maria Smith",
  "location_name": "Main Clinic",
  "location_address": "123 Main St, Paris, France",
  "product_name": "Dental Consultation",
  "plan_name": null,
  "tenant_slug": "my-business",
  "created_at": "2026-09-01T10:30:00+03:00",
  "customer": {
    "id": "a1b2c3d4-...",
    "name": "Paul Johnson",
    "email": "[email protected]"
  },
  "staff": { "id": "e5f6g7h8-...", "name": "Dr. Maria Smith" },
  "location": {
    "id": "i9j0k1l2-...",
    "name": "Main Clinic",
    "address": "123 Main St, Paris, France"
  },
  "product": { "id": "m3n4o5p6-...", "name": "Dental Consultation" },
  "plan": null,
  "metadata": {}
}
💡 The payload is rebuilt at delivery time
Clickobook sends you the booking's final state — not a snapshot from the moment the event fired. Discounts, the full-payment discount, the payment transaction and the invoice are all included even if they were finalised a moment after the booking was created. For online checkouts, the booking_created event is dispatched a few seconds after payment so your invoice is usually already attached.
Step 1 — Enable webhooks in Clickobook
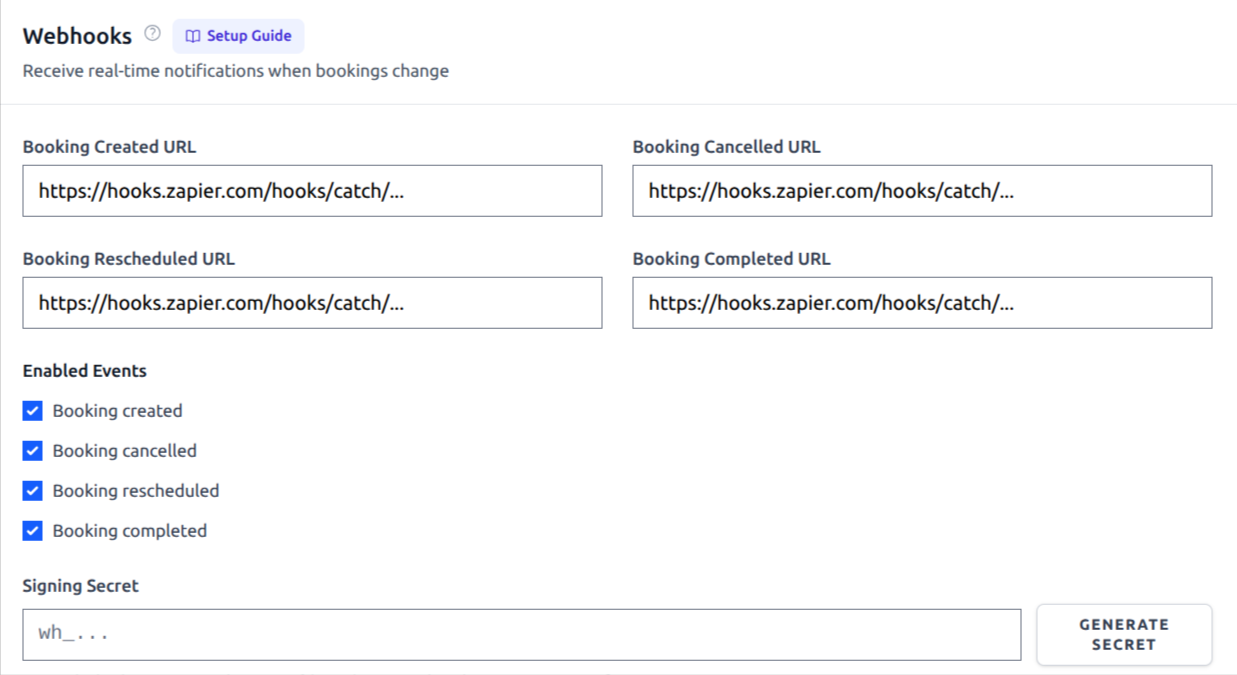
Everything starts in the admin panel. You add the destination URLs and tick the events you want — no code required.
-
1
Open Settings → Webhooks.
In the sidebar go to Settings and open the Webhooks tab. (This tab is available on plans that include the webhooks feature.)
-
2
Paste each destination URL.
There are four fields — Booking Created URL, Booking Cancelled URL, Booking Rescheduled URL and Booking Completed URL. Paste the webhook URL from your automation platform into the field for each event you want to receive.
-
3
Tick the events you want enabled.
Check the Enabled Events boxes for the events you configured. Remember: if a box is not ticked, that event is not sent.
-
4
(Recommended) Generate a Signing Secret.
Click Generate Secret to create a signing secret. This lets you cryptographically verify that each webhook really came from Clickobook (see the Security section below). Store it somewhere safe — your automation platform or endpoint uses it to validate requests.
-
5
Save.
Click Save Webhook Settings. The settings apply immediately — the next matching booking event will be delivered to your URL.
💡 Use the Setup Guide
The Webhooks tab has a Setup Guide button that opens an in-app walkthrough with the event list, payload reference and copy-paste steps for Zapier and n8n — handy reference when you configure a new integration.
⚠️ Test the URL is reachable
When you first set up a webhook, make a test booking to confirm the event arrives. Most automation platforms show the received data in their webhook trigger logs, so you can verify before building the rest of your automation.
Connect with Zapier
No code · 5 minutesZapier is the easiest way to connect Clickobook to thousands of apps with no coding. The key trick is that you use Zapier's built-in Webhooks by Zapier trigger to receive each Clickobook event, then chain any Zapier action onto it.
-
1
Create a new Zap with a Webhooks trigger.
Choose Webhooks by Zapier → Catch Hook as the trigger. Zapier generates a unique URL for you.
-
2
Copy that URL into Clickobook.
Paste it into the matching Webhook URL field in Settings → Webhooks (e.g. Booking Created URL) and tick the event. Save.
-
3
Trigger a test booking.
Make a real test booking. Zapier "catches" the payload and lets you confirm the trigger fired.
-
4
Map the fields and add an action.
In the Zap editor, pick the flat fields like
customer_name,customer_email,total_priceandbooking_date, then add an action — create a contact in HubSpot, a row in Google Sheets, or an invoice in QuickBooks. -
5
Publish the Zap.
Turn the Zap on. From now on, every matching booking event runs your automation automatically.
💡 One Zap per event, or use filters
The cleanest setup is one Zap per webhook event you care about (one for created, one for
cancelled, etc.) so each automation handles a single clear trigger. You can also use a single
Zap and add a Filter step on the event field.
Connect with n8n
Self-hosted · developer friendlyn8n is a powerful, self-hosted workflow automation tool. Because it accepts a standard webhook trigger, Clickobook integrates with it exactly like any other webhook. You get full control over expressions, branches and hundreds of node types — Slack, Google Sheets, QuickBooks, MySQL, SMTP and more.
-
1
Create a workflow with a Webhook trigger.
Add a Webhook trigger node and set the HTTP method to POST. n8n shows you a Webhook URL (plus a Test URL).
-
2
Paste the Production URL into Clickobook.
Copy the workflow's Production URL into the matching Clickobook webhook field. The Test URL only works while the workflow is set to "Listen for test event", so use the Production URL for a stable integration.
-
3
Activate the workflow.
Publish/activate the workflow so it is listening. Then make a test booking in Clickobook to capture a real payload.
-
4
Access the fields with n8n expressions.
Right after the Webhook trigger you can reference incoming data directly, e.g. the customer name and price. From anywhere in the workflow, refer to the webhook's captured item by name.
-
5
Add your downstream actions.
Connect the webhook to any nodes you need — log the booking, notify a chat channel, create a CRM record, or write to a database.
// Right after the Webhook trigger node, reference the fields directly:
Customer name:  {{ $json.customer_name }}
Email:          {{ $json.customer_email }}
Booking date:   {{ $json.booking_date }}
Total:          {{ $json.total_price }} {{ $json.currency }}

// From anywhere in the workflow:
{{ $('Webhook').item.json.customer_name }}
💡 Use the delivery headers too
Every request includes X-Booking-Event and X-Booking-Delivery-Id
headers. If you build an idempotent integration (one that must not double-process), store the delivery ID and skip any duplicate.
Connect with Make (formerly Integromat)
No code · visual scenario builderMake lets you build visual automation "scenarios" with drag-and-drop modules. Its Webhooks module receives Clickobook events over a plain HTTP POST, so the booking data arrives as JSON and you map it into your next module — Google Sheets, Slack, Airtable, HubSpot and hundreds more.
-
1
Create a scenario starting with a Webhook module.
Add the Webhooks module with the Custom webhook option. Make generates a webhook URL and asks you to send a sample payload to "reclaim" it.
-
2
Paste the URL into Clickobook and trigger a test booking.
Put the Make webhook URL into the matching Clickobook webhook field, then make a test booking. Make captures the JSON as the sample — confirm it and the module's data structure is set.
-
3
Map the fields into your next module.
You can map the webhook's values — e.g.
customer_name,total_price— into a Google Sheets "Add a row" module, a Slack "Post a message" module, or a CRM module. -
4
Turn the scenario on.
Save and run the scenario. Make listens continuously and fires it each time Clickobook sends an event.
💡 Split by event inside one scenario
If you use a single Make webhook for several Clickobook events, add a Router module
after the webhook and branch on the event field
(booking_created / booking_cancelled / booking_rescheduled / booking_completed) so each branch does the right thing.
Connect with Pabbly Connect
No code · affordable alternativePabbly Connect is another popular automation platform that accepts webhook triggers directly. Like the others, you create a Webhook trigger, paste its URL into Clickobook, fire a test booking to capture the payload, then build your workflow steps.
-
1
Add a Webhook trigger to your Pabbly workflow.
Search for the Webhook app and pick the trigger. Capture method POST. Pabbly shows you a webhook URL.
-
2
Paste the URL into Clickobook.
Put the Pabbly URL into the matching Clickobook webhook field and enable the event. Save.
-
3
Capture the test payload.
Click "Capture Webhook Response" and make a test booking in Clickobook. Pabbly stores the sample and makes the fields available in the mapper.
-
4
Map fields into your action steps.
Map
customer_email,service_name,total_priceetc. into apps like Google Sheets, Gmail, Slack or a CRM action.
💡 It's the same pattern everywhere
Zapier, n8n, Make and Pabbly all work the same way with Clickobook: create a webhook trigger, paste the URL into your settings, fire a test event, then map the JSON. Once you understand one, you can set up any of the others in minutes.
Verifying webhooks with the signing secret
Any public URL can be hit by anything, not just Clickobook. To be sure each webhook is authentic and
untampered, set a Signing Secret in Settings → Webhooks. When you do, every request
includes an X-Booking-Signature header — an
HMAC-SHA256 hash of the raw JSON body, computed with your secret — plus a timestamp and a
replay-proof signature that covers it.
| Header | Description |
|---|---|
| Content-Type | application/json |
| X-Booking-Tenant | Your tenant ID (lets you identify which business sent it) |
| X-Booking-Event | The event type (e.g. booking_created) |
| X-Booking-Delivery-Id | Unique delivery ID — use it to detect duplicates from retries |
| X-Booking-Signature | HMAC-SHA256 of the payload (legacy — still sent, only when a signing secret is set) |
| X-Booking-Timestamp | Unix seconds when the delivery was signed — check it is recent (see below) |
| X-Booking-Signature-V2 | t=<unix>,v1=<hmac_sha256("<t>.<body>")> — the timestamp is inside the digest, so an old request cannot be replayed |
Example — PHP endpoint
<?php
$payload = file_get_contents('php://input');
$secret  = 'wh_your_signing_secret';

$expected = hash_hmac('sha256', $payload, $secret);
$received = $_SERVER['HTTP_X_BOOKING_SIGNATURE'] ?? '';

if (hash_equals($expected, $received)) {
    // Valid — process the booking
    $data = json_decode($payload, true);
}
Example — Node.js endpoint
const crypto = require('crypto');

const secret = 'wh_your_signing_secret';
const body = JSON.stringify(req.body);
const expected = crypto
  .createHmac('sha256', secret)
  .update(body)
  .digest('hex');

if (expected === req.headers['x-booking-signature']) {
  // Valid — process the booking
}
Recommended — verify the replay-proof signature (V2)
The V2 header is the strongest check: reject anything older than
5 minutes, then recompute the
digest over <timestamp>.<body>. Because the timestamp is part of the signed string,
an intercepted request cannot be replayed with a fresh t=.
$header = $_SERVER['HTTP_X_BOOKING_SIGNATURE_V2'] ?? '';

if (preg_match('/^t=(\d+),v1=([a-f0-9]{64})$/', $header, $m)) {
    $timestamp = (int) $m[1];

    if (abs(time() - $timestamp) > 300) {
        http_response_code(400); // too old — possible replay
        exit;
    }

    $expected = hash_hmac('sha256', $timestamp.'.'.$payload, $secret);

    if (! hash_equals($expected, $m[2])) {
        http_response_code(401); // bad signature
        exit;
    }
}

// Authentic and fresh — process the booking
Keep verifying X-Booking-Signature if you already do — it is still sent, unchanged.
Example — PHP endpoint
<?php
$payload = file_get_contents('php://input');
$secret  = 'wh_your_signing_secret';

$expected = hash_hmac('sha256', $payload, $secret);
$received = $_SERVER['HTTP_X_BOOKING_SIGNATURE'] ?? '';

if (hash_equals($expected, $received)) {
    // Valid — process the booking
    $data = json_decode($payload, true);
}
Example — Node.js endpoint
const crypto = require('crypto');

const secret = 'wh_your_signing_secret';
const body = JSON.stringify(req.body);
const expected = crypto
  .createHmac('sha256', secret)
  .update(body)
  .digest('hex');

if (expected === req.headers['x-booking-signature']) {
  // Valid — process the booking
}
💡 Use always-on HTTPS
Always expose your webhook endpoint over HTTPS, and use the signing secret for
production. The delivery ID header is your idempotency key — if you see the same
X-Booking-Delivery-Id more than once (a retry), skip the duplicate instead of double-processing.
Retries, backoff and delivery reliability
Webhooks are delivered by a background queue, which gives you automatic retries if your endpoint is temporarily unreachable.
Up to 3 attempts with exponential backoff
Each event is attempted up to 3 times. If the first send fails (e.g. your endpoint returns an error or times out), Clickobook waits and retries — roughly 1 minute, then 5 minutes, then 30 minutes — before marking the delivery as failed.
Delivery history is logged
Every delivery is recorded with its event, target URL, attempt count, HTTP response status and error, timestamps and whether it was delivered, failed or skipped. This makes troubleshooting a broken endpoint straightforward.
⚠️ Webhooks work even if your site is slow
Delivery runs on Clickobook's background workers with a short HTTP timeout. Your endpoint does not need to be fast — it just needs to accept the POST. If it returns a non-success status, the retry schedule above kicks in automatically.
Real-world automation ideas (recipes)
These are the most common Clickobook webhook automations we see. Each works with any of the four automation platforms above.
New booking → new CRM contact
On booking_created, create a contact in HubSpot / Salesforce / Pipedrive using customer_name, customer_email and customer_phone — optionally create an opportunity from service_name + total_price.
Every booking → Google Sheets row
Keep a live revenue and booking log. Append booking_number, date, service, customer and total_price as a new row on each event — perfect for simple dashboards and reports.
New / cancelled booking → team notification
Post to Slack or Microsoft Teams when a booking is created (so staff see it) and when one is cancelled (so you can re-book the slot fast).
Completed booking → invoice & review request
On booking_completed, create an invoice in QuickBooks/Xero using the tax and totals (net_price, tax_amount, total_price), and send a review request to boost your social proof.
Catch unpaid balances
Watch the balance_due field. When a booking has a balance due (deposit paid, full amount not yet collected), trigger a reminder automation or flag the row in your tracking sheet.
✅ Your webhook setup checklist
- 1. Decide which events you need (created / cancelled / rescheduled / completed).
- 2. Create a webhook trigger in Zapier, n8n, Make or Pabbly and copy its URL.
- 3. Paste the URL into the matching field in Settings → Webhooks and tick the event.
- 4. Generate a Signing Secret and set it in your endpoint / platform for verification.
- 5. Save, then make a test booking to confirm the event arrives.
- 6. Map the fields and add your action, then publish/enable the automation.
- 7. Watch the delivery log if something does not arrive — it shows attempts, status codes and errors.
Booking webhook integrations — frequently asked questions
No. If you use an automation platform like Zapier, n8n, Make or Pabbly Connect, you never write code — you create a webhook trigger, paste the generated URL into your Clickobook settings, and map the incoming fields to actions. Coding is only needed if you want to build your own custom endpoint instead.
Four events: booking_created (a new booking is made), booking_cancelled (a booking is cancelled), booking_rescheduled (a booking is moved to a new date/time), and booking_completed (a booking is marked done). Each event has its own URL and its own enable toggle, so you can send only the events you care about.
Yes. The payload carries total_price, tax_rate, tax_amount, tax_label, net_price, currency, payment_method, payment_provider, payment_status, deposit_amount, paid_amount, balance_due, invoice_id and invoice_number — so you can build accurate invoices, track deposits and flag unpaid balances in your accounting or CRM.
Yes. Generate a Signing Secret in Settings → Webhooks. When set, every request includes an X-Booking-Signature header with an HMAC-SHA256 hash of the JSON body computed with your secret (plus X-Booking-Timestamp and a replay-proof X-Booking-Signature-V2 whose digest covers the timestamp). Your endpoint recomputes the hash and compares it — if they match, the message is authentic and untampered. Verify the timestamp too, so an intercepted request cannot be replayed later.
The platform retries automatically. Each event is attempted up to 3 times with exponential backoff — roughly 1 minute, 5 minutes, then 30 minutes — before it is marked as failed. Combined with the unique X-Booking-Delivery-Id header, you can detect and ignore any duplicate retry.
Yes. Make is a webhook-native automation platform. You add a "Webhooks" module → "Custom webhook", generate a URL, paste it into the relevant booking event URL field in Clickobook, then map the JSON fields into your scenario — for example create a Google Sheets row, send a Slack message or add a CRM contact.
Yes. Webhooks are triggered by backend events regardless of whether your customers book on the Clickobook platform domain or your own custom domain. You configure the receive URLs (where your webhook goes out to) in Settings → Webhooks, exactly the same in both cases.
Webhooks are included in Clickobook plans that carry the webhooks feature — there is no per-webhook or per-event fee. You only pay whatever your automation platform (Zapier, Make, Pabbly) and its connected apps charge for their own usage.
Related resources
How to Set Up Online Payments (Stripe + PayPal)
The payment setup your webhook payloads carry — cards, deposits and invoices.
How to Automate Appointment Reminders
Keep customers informed automatically with email and SMS reminders.
All guides
Browse more how-to articles for service businesses
Clickobook features
See everything the platform offers
Put your booking data to work automatically
Clickobook pushes every booking event to your CRM, accounting, spreadsheets and chat — with retries, signature verification and 0% commission. Start your free trial and connect your first webhook in minutes.